Chapter 7
Modifying Jikes RVM
The sections Coding Style and Coding Conventions give a rough overview on existing coding conventions.
Jikes RVM is a bleeding-edge research project. You will find that some of the code does not live up to product quality standards. Don’t hesitate to help rectify this by contributing clean-ups, refactorings, bug fixes, tests and missing documentation to the project.
7.1 Adding command line options
There are several places in Jikes RVM where options can be defined and each of those uses another approach. There are options for
- MMTk
- VM subystems such as the compilers and the AOS
- the core VM
7.1.1 MMTk options
Options that are relevant for MMTk can be found in the package org.mmtk.utility.options. The only exception are options that must be parsed before the VM can actually start (e.g. -Xms and -Xmx). Those options are classified as core VM options.
To create a new MMTk option, create a new class in the org.mmtk.utility.options package, e.g. YourOption. The class must extend a class from the package org.vmutil.options. Depending on the type of option, you may want to implement the validate method.
public class YourOption extends org.vmutil.options.IntOption {
private static final int DEFAULT_VALUE = 42;
public YourOption() {
super(Options.set, "The␣name␣of␣your␣option",
"The␣description␣of␣your␣option", DEFAULT_VALUE);
}
@Override
protected void validate() {
failIf(value < 0 || value > 55,
"Value␣for␣your␣option␣must␣be␣non-negative␣and␣55␣or␣smaller");
}
}
The newly created option must be linked to the rest of the system. In Options from the package org.mmtk.utility.options, add a static variable for the option:
Lastly, you will need to create an instance of the option in an appropriate place:
General options can be created in the constructor of org.mmtk.plan.Plan. If the option is specific to a garbage collector, you can create it in one of the collector’s classes.
The actual String for the option that will be used on the command line is not determined by MMTk but computed by the VM (Jikes RVM in this case). To look up the chosen key for the newly added option, rebuild Jikes RVM, pass -X:gc and examine the output. The output displays a list of MMTk options. This list should now include the newly-added option. To verify that the default value is correctly set, use -X:gc:printOptions and check the value.
7.1.2 VM subsystem options
Classes for handling VM subsystem options are generated during the build process. The source files for the options are in rvm/src-generated/options. The generated option classes are
- org.jikesrvm.Options for VM options
- org.jikesrvm.adaptive.util.AOSExternalOptions for AOS Options
- org.jikesrvm.compilers.baseline.BaselineOptions for baseline compiler options
- org.jikesrvm.compilers.opt.OptOptions for opt compiler options
Each option class is generated from the matching template file (e.g. AOSOptions.template for AOSExternalOptions) and its specific options (e.g. BooleanOptions.aos.dat and ValueOptions.aos.dat). Additionally, the baseline and opt compiler options also use the shared option files SharedBooleanOptions.dat and SharedValueOptions.dat.
The existing options and documentation in the files should be sufficient to create new options. Please notify us if the documentation needs to be improved.
7.1.3 Core VM options
Options for the core VM are not specific to a certain subsystem. These options are recognized for all builds of Jikes RVM. This category includes
- bootloader options (e.g. file names for code, data and reference maps of the VM)
- options that must be processed without help of Java code (e.g. Xms for the initial heap size or -Xbootclasspath/p:<cp> for modification of the boot classpath)
- prefixes for option groups like -X:opt or -X:gc
Note that an option can be recognized without being available for use. For example, attempting to use -X:opt to get help about the optimizing compiler options will fail on builds that don’t include the optimizing compiler.
All Core VM options are parsed in the C code. Some are also processed in Java code. If you want to add a core VM option, you will need to modify the bootloader code in order to ensure that options are passed correctly. Recall that the Jikes RVM command line help (-help) says the following:
(to execute a class)
or JikesRVM [-options] -jar jarfile [args...]
(to execute a jar file)
The bootloader enforces this usage. It parses all options and if it encounters an option that it doesn’t recognize, it will assume that this option signifies the start of the application arguments. Consequently, it is necessary to tell the bootloader about all core VM options. The relevant code fragment is shown below.
#define PROCESSORS_INDEX BOOTCLASSPATH_A_INDEX + 1
#define numNonstandardArgs PROCESSORS_INDEX + 1
static const char* nonStandardArgs[numNonstandardArgs] = {
... more code here ...
"-X:availableProcessors=",
};
To add a new option, make the following modifications:
#define PROCESSORS_INDEX BOOTCLASSPATH_A_INDEX + 1
#define YOUR_OPTION_INDEX PROCESSORS_INDEX + 1
#define numNonstandardArgs YOUR_OPTION_INDEX + 1
static const char* nonStandardArgs[numNonstandardArgs] = {
... more code here ...
"-X:availableProcessors=",
"-X:your_option=",
};
It is recommended that you also add a description of your option to the nonstandardusage array.
You must modify processCommandLineArguments(..) to recognize the option in order to make sure that the option is properly handled and/or passed to the Java code. Failing to do so will cause bugs like RVM-1066. For example, if the option were to take one token, the original code
if (STRNEQUAL(token, "-D", 2)
|| STRNEQUAL(token, nonStandardArgs[INDEX], 5)
... more code here ...
|| STRNEQUAL(token, nonStandardArgs[BOOTCLASSPATH_P_INDEX], 18)
|| STRNEQUAL(token, nonStandardArgs[BOOTCLASSPATH_A_INDEX], 18)
|| STRNEQUAL(token, nonStandardArgs[PROCESSORS_INDEX], 14))
{
CLAs[n_JCLAs++]=token;
continue;
}
would need to be changed to
|| STRNEQUAL(token, nonStandardArgs[INDEX], 5)
... more code here ...
|| STRNEQUAL(token, nonStandardArgs[BOOTCLASSPATH_P_INDEX], 18)
|| STRNEQUAL(token, nonStandardArgs[BOOTCLASSPATH_A_INDEX], 18)
|| STRNEQUAL(token, nonStandardArgs[PROCESSORS_INDEX], 14)
|| STRNEQUAL(token, nonStandardArgs[YOUR_OPTION_INDEX], $LENGTH))
{
CLAs[n_JCLAs++]=token;
continue;
}
where $LENGTH is the length of the string for your option that you added to the nonStandardArgs array.
The above steps are sufficient for options that only need processing in bootloader code. If your option needs processing in Java, you will need to modify CommandLineArgs. Firstly, add a new constant for your option to PrefixType. For example, the code
would need to be changed to
Secondly, you will need to create a new Prefix instance in the prefixes array. After that, you’re ready to add the processing of your option.
7.2 Adding a new garbage collector
7.2.1 Overview
This document describes how to add a new garbage collector to Jikes RVM. We don’t address how to design a new GC algorithm, just how to add a ”new” GC to the system and then build it. We do this by cloning an existing GC. We leave it to you to design your own GC!
7.2.2 Prerequisites
Ensure that you have got a clean copy of the source (either a recent release or the git HEAD) and can correctly and successfully build one of the base garbage collectors. There’s little point in trying to build your own until you can reliably build an existing one. I suggest you start with MarkSweep, and that you use the buildit script:
Then test your GC:
You should have seen some output like this:
[echo] Test Result for [BaseBaseMarkSweep|gctest] InlineAllocation (default) : SUCCESS
[echo] Test Result for [BaseBaseMarkSweep|gctest] ReferenceTest (default) : SUCCESS
[echo] Test Result for [BaseBaseMarkSweep|gctest] ReferenceStress (default) : SUCCESS
[echo] Test Result for [BaseBaseMarkSweep|gctest] FixedLive (default) : SUCCESS
[echo] Test Result for [BaseBaseMarkSweep|gctest] LargeAlloc (default) : SUCCESS
[echo] Test Result for [BaseBaseMarkSweep|gctest] Exhaust (default) : SUCCESS
If this is not working, you should probably go and (re) read the section in the user guide on how to build and run the VM.
7.2.3 Cloning the MarkSweep GC
The best way to do this is in eclipse or a similar tool (see here for how to work with eclipse):
- Clone the org.mmtk.plan.marksweep as org.mmtk.plan.mygc
- You can do this with Eclipse:
- Navigate to org.mmtk.plan.marksweep (within MMTk/src)
- Right click over org.mmtk.plan.marksweep and select ”Copy”
- Right click again, and select ”Paste”, and name the target
org.mmtk.plan.mygc (or whatever you like) - This will have cloned the marksweep GC in a new package called org.mmtk.plan.mygc
- or by hand:
- Copy the directory MMTk/org/mmtk/plan/marksweep to
MMTk/org/mmtk/plan/mygc - Edit each file within MMTk/org/mmtk/plan/mygc and change its package declaration to org.mmtk.plan.mygc
- Copy the directory MMTk/org/mmtk/plan/marksweep to
- We can leave the GC called ”MS” for now (the file names will all be MMTk/org/mmtk/plan/mygc/MS*.java)
- You can do this with Eclipse:
- Clone the BaseBaseMarkSweep.properties file as BaseBaseMyGC.properties:
- Go to build/configs, and right click over BaseBaseMarkSweep.properties, and select ”Copy”
- Right click and select ”Paste”, and paste as BaseBaseMyGC.properties
- Edit BaseBaseMyGC.properties, changing the text:
to
- Now test your new GC:
You should have got similar output to your test of MarkSweep above.
That’s it. You’re done. ☺
7.2.4 Making it Prettier
You may have noticed that when you cloned the package org.mmtk.plan.marksweep, all the classes retained their old names (although in your new namespace; org.mmtk.plan.mygc). You can trivially change the class names in an IDE like eclipse. You can do the same with your favorite text editor, but you’ll need to be sure that you change the references carefully. To change the class names in eclipse, just follow the procedure below for each class in org.mmtk.plan.mygc:
- Navigate to the class you want changed (eg org.mmtk.plan.mygc.MS)
- Right click on the class (MS) and select ”Refactor→ Rename...” and then type in your new name, (eg MyGC)
- Do the same for each of the other classes:
- MS → MyGC
- MSCollector → MyGCCollector
- MSConstraints → MyGCConstraints
- MSMutator → MyGCMutator
- MSTraceLocal → MyGCTraceLocal
- Edit your configuration/s to ensure they refer to the renamed classes (since
your IDE is unlikely to have done this automatically for you)
- Go to build/configs, and edit each file *MyGC.properties to refer to your renamed classes
7.2.5 Beyond BaseBaseMyGC
You probably want to build with configurations other than just BaseBase. If so, clone configurations from MarkSweep, just as you did above (for example, clone FullAdaptiveMarkSweep as FullAdaptiveMyGC). It’s best to leave the Fast configurations for last, when you’re sure that your GC is working correctly.
7.2.6 What Next?
Once you have this working, you have successfully created and tested your own GC without writing a line of code! You are ready to start the slightly more tricky process of writing your own garbage collector code.
If you are writing a new GC, you should definitely be aware of the MMTk test harness, which allows you to test and debug MMTk in a very well contained pure Java environment, without the rest of Jikes RVM. This allows you to write unit tests and corner cases, and moreover, allows you to edit and debug MMTk entirely from within your IDE.
7.3 Coding Conventions
7.3.1 Assertions in Jikes RVM and MMTk
Partly for historical reasons, we use our own built-in assertion facility rather than the one that appeared in Sun®’s JDK 1.4. All assertion checks have one of the two forms:
if (VM.VerifyAssertions) VM._assert(condition, message)
VM.VerifyAssertions is a public static final field. The config.assertions configuration variable determines VM.VerifyAssertions’ value. If config.assertions is set to none, Jikes RVM has no assertion overhead.
If you use the form without a message, then the default message ”vm internal error at:” will appear.
If you use the form with a message the message must be a single string literal. Doing string appends in assertions can be a source of horrible performance problems when assertions are enabled (i.e. most development builds). If you want to provide a more detailed error message when the assertion fails, then you must use the following coding pattern:
... build message ...
VM._assert(VM.NOT_REACHED, message);
}
An assertion failure is always followed by a stack dump.
Use VM.ExtremeAssertions instead of VM.VerifyAssertions if the assertion is costly to check but generally useful. These kinds of assertions are only enabled when config.assertions is set to extreme.
Use IR.SANITY_CHECK or IR.PARANOID to guard assertions that relate to the intermediate representation in the optimizing compiler.
7.3.2 Assertions in the MMTk Test Harness
The assert keyword may be used in the MMTk Harness.
7.3.3 Error Handling
All code in the system needs to detect and handle errors. If you know that your code does not handle certain situations, you should aim to write the code in way that detects these situations. The code also needs to be documented well enough so that users get a hint about the source of the problem. Keep in mind that the Jikes RVM is also used by students who may not be as familiar with the domain as researchers are.
Examples
- The code does not work at all in a certain situation, e.g. it gives incorrect results when the optimizing compiler is enabled or a certain optimization is turned on. In this case, the best approach is to detect the situation and fail fast. This can be done using assertions. You can use VM.sysFail(..) for builds without assertions if correct execution after failure is impossible.
- A compiler optimizations fails. The correct approach is to throw an OptimizingCompilerException (e.g. via one of the static methods provided by that class). This will lead to a hard failure when -X:vm:errorsFatal=true is set (which is the case in regression tests). In other cases, the VM will just revert to using the baseline compiler.
- A command line option has a limited range of values. In MMTk, the correct approach is to implement the validate() method for the option. In other places, the value of the option needs to be checked at a suitable time.
7.4 Coding Style
Regrettably, some code in the current system does not follow any consistent coding style. This is an unfortunate residuum of the system’s evolution.
We use checkstyle to support a gradually expanding subset of coding conventions. The current set of enforced checkstyle rules are defined by $RVM_ROOT/build/checkstyle/rvm-checks.xml and are verified as part of the pre-commit test run. To check for violations of the coding style without running the tests, use buildit or run ”ant checkstyle” from the command line.
7.4.1 File Headers
Every file needs to have the license header.
A Java example of the notices follows.
* This file is part of the Jikes RVM project (http://jikesrvm.org).
*
* This file is licensed to You under the Eclipse Public License (EPL);
* You may not use this file except in compliance with the License. You
* may obtain a copy of the License at
*
* http://www.opensource.org/licenses/eclipse-1.0.php
*
* See the COPYRIGHT.txt file distributed with this work for information
* regarding copyright ownership.
*/
package org.jikesrvm;
import org.jikesrvm.classloader.ClassLoader; // FILL ME IN
/**
* TODO Substitute a brief description of what this program or library does.
*/
7.4.2 Coding style description
The JikesTM RVM coding style guidelines are similar to the Sun® Microsystems ”Code Conventions for the JavaTM Programming Language”, with a few exceptions listed below. Most of the style guide is intuitive; however, please read through the document (or at least look at its sample code).
We have adopted four modifications to the Sun code conventions:
- Two-space indenting The Sun coding convention suggests 4 space indenting; however with 80-column lines and four-space indenting, there is very little room left for code. Thus, we recommend using 2 space indenting. There are to be no tabs in the source files or trailing white space on any line.
- 132 column lines in exceptional cases The Sun coding convention is that lines be no longer than 80 columns. Several Jikes RVM contributors have found this constraining. Therefore, we allow 132 column lines for exceptional cases, such as to avoid bad line breaks.
- if (VM.VerifyAssertions) As a special case, the condition if
(VM.VerifyAssertions) is usually immediately followed by the call to VM._assert(), with a single space substituting for the normal newline-and-indentation. See the coding conventions for an example. - Capitalized fields Under the Sun coding conventions, and as specified in The Java Language Specification, Second Edition, the names of fields begin with a lowercase letter. (The only exception they give is for some final static constants, which have names ALL_IN_CAPITAL_LETTERS, with underscores separating them.) That convention reserves IdentifiersBeginningWithACapitalLetterFollowedByMixedCase for the names of classes and interfaces. However, most of the final fields in the Configuration class and the Properties interface also are in that format. Since the VM class inherits fields from both Properties and Configuration, that’s how we get VM.VerifyAssertions, etc.
7.4.3 Javadoc requirements
All non-trivial files should contain descriptive comments in JavadocTM form so that documentation can be generated automatically. Of course, additional non-Javadoc source code comments should appear as appropriate.
- Classes, methods and fields should have a block comment describing them if it makes sense. There is no need to add comments merely for the sake of commenting. For example, it is not necessary to add a comment for a method if the comment does not provide more information than the signature and the method name already do.
- JavaDoc comments must not be copied from methods that are being overriden. If the comment from the method that you are overriding is sufficient, you do not need to provide JavaDoc for the newly added method - JavaDoc will automatically copy the JavaDoc from the overriden method. If you want to extend the comment from the overriden method with new information, use @inheritDoc to copy the comment from the superclass and add your text.
- JavaDoc for methods contains a short description of their arguments (using @param), the return value (using @return) and the exceptions they may throw (using @throws).
- Each class should include @see and @link references as appropriate.
7.5 Compiler DNA
The Jikes RVM adaptive system uses the compiler DNA found in
org.jikesrvm.adaptive.recompilation.CompilerDNA. The important values in
here are the compilationRates and the speedupRates. If you modify Jikes
RVM then it’s likely you need to recalibrate the adaptive system for your
changes.
In Jikes RVM 3.1.3 or earlier, do the following:
- run the compiler-dna test harness (”ant -f test.xml -Dtest-run.name=compiler-dna”). This will automatically compile and run Jikes RVM on SPEC JVM ’98. You will want to configure the ant property external.lib.dir to be a directory containing your SPEC JVM ’98 directory. Your SPEC JVM ’98 directory must be named ”SPECjvm98”.
- load the xml file results/tests/compiler-dna/Report.xml into either an XML viewer (such as a web browser) or into a text editor
- find the section named Measure_Compilation_Base, then look within
this section for statistics and find the static Base.bcb/ms. For example,
<statistic key="Base.bcb/ms" value="1069.66"/>. In the
compilationRates array this will be the value of element 0, it corresponds to how many bytecodes the baseline compiler can compile per millisecond. - find the section named Measure_Compilation_Opt_0 and the statistic Opt.bcb/ms. This is element 1 in the compilationRates array.
- find the section named Measure_Compilation_Opt_1 and the statistic Opt.bcb/ms. This is element 2 in the compilationRates array.
- find the section named Measure_Compilation_Opt_2 and the statistic Opt.bcb/ms. This is element 3 in the compilationRates array.
- find the section named Measure_Performance_Base and the statistic named aggregate.best.score and record its value. For example, for <statistic key="aggregate.best.score" value="28.90"/> you would record 28.90.
- find the section named Measure_Performance_Opt_0 and the statistic named aggregate.best.score. Divide this value by the value you recorded in step 7, this is the value for element 1 in the speedupRates array. For example, for <statistic key="aggregate.best.score" value="137.50"/> the speedupRates array element 1 should have a value of 4.76.
- find the section named Measure_Performance_Opt_1 and the statistic named aggregate.best.score. As with stage 8 divide this value by the value recorded in step 7, this is the value for element 2 in the speedupRates array.
- find the section named Measure_Performance_Opt_2 and the statistic named aggregate.best.score. As with stage 8 divide this value by the value recorded in step 7, this is the value for element 3 in the speedupRates array.
In Jikes RVM 3.1.4 or later, the directory for the test results (e.g.
results/tests/compiler-dna/) should contain a file CompilerDNA.xml.
Copy the contents into CompilerDNA and modify them so that the code
compiles.
You should then save CompilerDNA and recompile a production RVM which will use these values.
If you are frequently changing the compiler dna, you may want to use the command line option -X:aos:dna=<file name> to dynamically load compiler dna data without having to rebuild Jikes RVM.
7.6 Editing Jikes RVM in an IDE
One goal of the JikesRVM project over recent years has been the ability to develop Jikes RVM in a development environment such as Eclipse. This has been possible for the MMTk component since 2005, and as of early 2007 (release 2.9.0) it is possible to work with the majority of the Jikes RVM codebase in Eclipse and similar environments. With Jikes RVM release 2.9.1, setting up your Eclipse environment to work with Jikes RVM became even easier.
7.6.1 Editing JikesRVM in Eclipse
These instructions assume you are working with Jikes RVM version 2.9.1 or later.
- Create a JikesRVM source tree either via Git checkout or unpacking a distribution.
- Create the machine-generated files and eclipse metadata:
- If you have a recent version of Jikes RVM (3.0 onwards):
Note that if you will not or cannot build on your local machine, substitute localhost for the name of a host you can build on (buildit will perform the build remotely and then copy the requisite files back).
- If you are working on an older version (2.9.1 - 2.9.3), you can follow this
procedure:
$ cd jikesrvm
$ ant -Dhost.name=ia32-linux -Dconfig.name=development
$ ant -Dhost.name=ia32-linux -Dconfig.name=development eclipse-projectIf you will not or cannot build on your local machine:
- copy your tree to build build host somehow
- perform the above ant tasks
- copy the following generated files and directories back to the machine you
will edit on:
- jikesrvm/.project
- jikesrvm/.classpath
- jikesrvm/eclipse
- Import the newly created Eclipse project into your Eclipse workspace.
- From Eclipse, select File → Import
- Select ”Existing Projects Into Workspace”
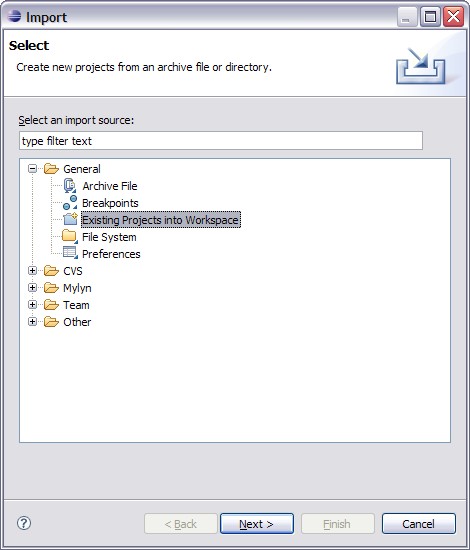
- Browse to find the top-level directory.
- Select the project (in this case JikesRVM ia32-linux development)
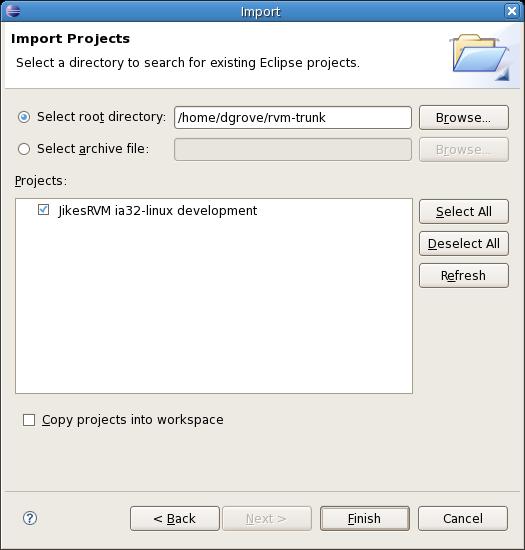
- Hit Finish
7.6.2 Setup for easier compliance with the Checkstyle rules
If you consider contributing changes back to Jikes RVM, it is helpful to configure your IDE to comply with the Jikes RVM coding style. The coding style forbids the use of tabs and requires that no line ends with whitespace.
If you have a separate workspace for your work with Jikes RVM, you can set up Eclipse for correct tab usage by configuring the text editors. Go to Window → Preferences and then to General → Editors → Text editors (Eclipse 3.6) or Window → Preferences → General → Editors → Text Editors (Eclipse 3.5 and earlier). Check ”Insert spaces for tabs”. Make sure that ”Displayed tab width” is set to 2. This setting affects the non-Java editors (e.g. XML editor for the ant files for the build).
To set the tab width for Java code, you need to setup the Java code style. We currently do not provide a style template, so you will have to define your own. Go to the project properties (e.g. via Project → Properties) and select Java Code Style → Formatter. Check the box ”Enable project specific settings” and create a new profile for Jikes RVM. Edit the new profile. In the edit dialog, choose the tab ”Indentation”. Set the tab policy to ”Spaces only” and set both indentation size and tab size to 2. Also make sure that the box ”Empty lines” at the bottom of the ”Indentation” tab is not checked.
To ensure that you do not introduce whitespace at the end of lines you can configure Eclipse’s Save actions in the project properties at Java Editor → Save Actions. Check the box ”Enable project specific settings” and the box ”Perform the selected actions on save” as well as ”Additional actions”. Press ”Configure” and check the box ”Remove trailing whitespace” in the ”Code Organizing” tab.
7.6.3 Editing JikesRVM in NetBeans
- Follow the instructions for Eclipse including building the eclipse project with ant
- Install the Eclipse project importer
- Select File → Import Project → Eclipse Project
- Choose to import project ignoring project dependencies
- Select the top-level directory you created with the JikesRVM in as the project to import
- Select a new folder as the destination (workspace) for the import
- Hit Finish